
WordPress is shipped with the jQuery UI Datepicker script. This widget allows you to select a date from a popup or inline calendar. An added bonus is that the script is localized so that the display reflects the language chosen in the WordPress installation.
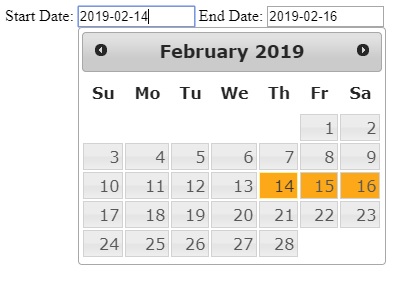
This post outlines the steps to take to use the Datepicker script to input two dates, begin and end, that selects a range of dates. The range will be highlighted in the modal window.
To make use of the Datepicker, first you need to enqueue the scripts. Next, you need two date input fields to specify the start date and end date of the date range. Finally, you need to apply a jQuery script to the input fields to activate the datapicker modal windows.
Enqueue scripts and styles:
function spiffy_scripts_styles() {
wp_enqueue_script( 'jquery-ui-datepicker' );
wp_register_style( 'jquery-ui', 'https://code.jquery.com/ui/1.11.2/themes/smoothness/jquery-ui.css' );
wp_enqueue_style( 'jquery-ui' );
wp_add_inline_style( 'jquery-ui', '.dp-highlight a { background: orange !important; }' );
}
add_action('wp_enqueue_scripts', 'spiffy_scripts_styles');    // Front-end
add_action('admin_enqueue_scripts', spiffy_scripts_styles');   // Back-end
You might notice the extra inline style we added. This is to highlight the date range selected in the modal window.
Two input fields:
<input id="event_begin" class="spiffy-date-field" name="event_begin" size="12" type="text" value="2019-02-14" />
<input id="event_end" class="spiffy-date-field" name="event_end" size="12" type="text" value="2019-02-14" />
The script works best when a starting value is given for the input field.
jQuery script:
jQuery(document).ready(function($){
	// Datepicker range
	$(".spiffy-date-field").datepicker({
		dateFormat : "yy-mm-dd",
		showButtonPanel: false,
		beforeShowDay: function (date) {
			var date1 = $.datepicker.parseDate('yy-mm-dd', $("#event_begin").val());
			var date2 = $.datepicker.parseDate('yy-mm-dd', $("#event_end").val());
			return [true, date1 && ((date.getTime() == date1.getTime()) || (date2 && date >= date1 && date <= date2)) ? "dp-highlight" : ""];
		},
		onSelect: function(dateText, inst) {
			var olddate1 = $.datepicker.parseDate('yy-mm-dd', $("#event_begin").val());
			var olddate2 = $.datepicker.parseDate('yy-mm-dd', $("#event_end").val());
			$(this).val(dateText);
			var date1 = $.datepicker.parseDate('yy-mm-dd', $("#event_begin").val());
			var date2 = $.datepicker.parseDate('yy-mm-dd', $("#event_end").val());
			var selectedDate = $.datepicker.parseDate('yy-mm-dd', dateText);

			if (date2 < date1) {
				if (dateText == $("#event_begin").val()) {
					$("#event_end").val( $("#event_begin").val() );
				} else {
					$("#event_begin").val( $("#event_end").val() );
				}
			}
		}
	});
});
Notes
- The script ensures that the start date is always less than or equal to the end date.
- The range is highlighted in the modal window by the added CSS class.
- "showButtonPanel: false" is needed for use on the front-end of WordPress. On the back-end, the button panel is already disabled by WordPress.
View the script in action at jsfiddle.